|strength2 =11,400 infantry,<br>2,600 cavalry,<br>12 guns
|strength2 =11,400 infantry,<br>2,600 cavalry,<br>12 guns
|strength1 =9,000 infantry,<br>3,000 cavalry,<br>25 guns
|strength1 =9,000 infantry,<br>3,000 cavalry,<br>25 guns
|casualties2 =1,755 dead, 1,307 wounded, 824 captured<ref>Ilari p.114</ref>
|casualties2 =1,755 dead, 1,307 wounded, 824 capturedIlarip114
|casualties1 =397 dead, 1,153 wounded or captured<ref>Ilari p.114</ref>
|casualties1 =397 dead, 1,153 wounded or capturedIlarip114
|}}
|}}
{{Campaignbox War of the Austrian Succession: Italy}}
{{Campaignbox War of the Austrian Succession: Italy}}
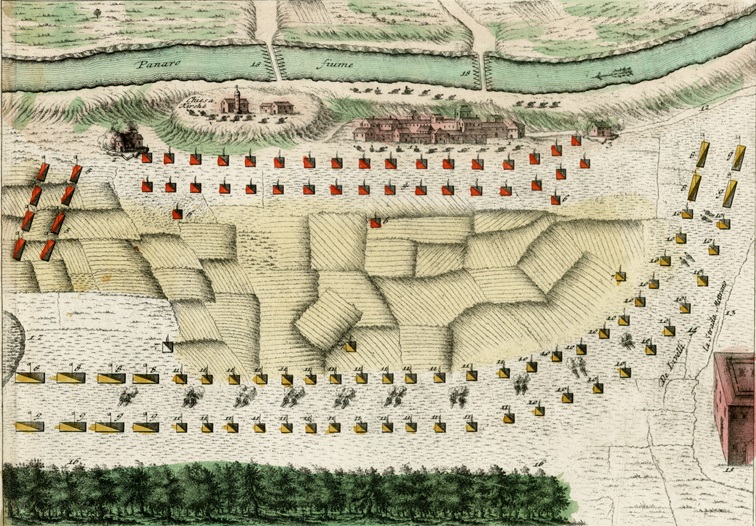
On the morning of 8 February 1743, Gages drew up his army facing northwest on the outskirts of Camposanto arranged in the traditional fashion with infantry in the center and cavalry on the wings.{{sfn|Browning|1995|p=132}} The Spanish commander deployed his army in two lines with both right and left flanks resting on the Panaro. The town of Camposanto was behind the Spanish center and the Spanish artillery was divided into three batteries. The Spanish cavalry and dragoons were arranged with nine squadrons on the right and three squadrons on the left. At 10:00 am, Traun’s army appeared again, led by their cavalry and the front of their infantry columns.{{sfn|Melendreras Gimeno|1987|p=14}}
On the morning of 8 February 1743, Gages drew up his army facing northwest on the outskirts of Camposanto arranged in the traditional fashion with infantry in the center and cavalry on the wings.{{sfn|Browning|1995|p=132}} The Spanish commander deployed his army in two lines with both right and left flanks resting on the Panaro. The town of Camposanto was behind the Spanish center and the Spanish artillery was divided into three batteries. The Spanish cavalry and dragoons were arranged with nine squadrons on the right and three squadrons on the left. At 10:00 am, Traun’s army appeared again, led by their cavalry and the front of their infantry columns.{{sfn|Melendreras Gimeno|1987|p=14}}
Traun drew up his 11,000-strong army with infantry in the center and cavalry on the wings, parallel to the Spanish lines. He placed the Sardinian cavalry on his left flank under [[Ferdinand Charles, comte d’Aspremont-Lynden]]. However, being slightly outnumbered, Traun chose to gamble with an un-orthodox strategy. Instead of aligning his soldiers directly opposite the Spanish line, he shifted his troops to the northeast. This placed Traun’s infantry center opposite the gap between Gages’ infantry center and his right wing of cavalry. This meant that Traun would have a greater superiority of numbers on his left wing so he could deliver a flank attack on the Spanish right. The downside was that Traun’s own right flank would be vulnerable to an attack by the Spanish left flank. Traun hoped the troops of his right wing could delay the Spanish left wing long enough for the action on his other wing to be decisive.{{sfn|Browning|1995|p=132}}
Traun drew up his 11,000-strong army with infantry in the center and cavalry on the wings, parallel to the Spanish lines. He placed the Sardinian cavalry on his left flank under [[Ferdinand Charles, comte d’Aspremont-Lynden]]. However, being slightly outnumbered, Traun chose to gamble with an un-orthodox strategy. Instead of aligning his soldiers directly opposite the Spanish line, he shifted his troops to the northeast. This placed Traun’s infantry center opposite the gap between Gages’ infantry center and his right wing of cavalry. This meant that Traun would have a greater superiority of numbers on his left wing so he could deliver a flank attack on the Spanish right. The was that Traun’s own right flank would be vulnerable to an attack by the Spanish left flank. Traun hoped the troops of his right wing could delay the Spanish left wing long enough for the action on his other wing to be decisive.{{sfn|Browning|1995|p=132}}
Traun hoped to keep the battle short so Gages would not have time to react to his unconventional plan. Gages might have waited until the following day to start the battle. Instead, Gages unwittingly chose 4:00 pm in the afternoon to launch his attack, which left only two hours of February daylight for a battle. This fitted neatly with Traun’s plan. The Spanish cavalry on the right charged, wounded Aspremont, and scattered the Sardinian horsemen on the Allied left. However, instead of wheeling and striking the exposed Allied left flank infantry, the Spanish mounted troops indulged in a reckless pursuit of the fleeing Sardinian cavalry. The Spanish left flank cavalry also enjoyed an initial success against the Austrian cavalry on the Allied right flank.{{sfn|Browning|1995|p=132}}
Traun hoped to keep the battle short so Gages would not have time to react to his unconventional plan. Gages might have waited until the following day to start the battle. Instead, Gages unwittingly chose 4:00 pm in the afternoon to launch his attack, which left only two hours of February daylight for a battle. This fitted neatly with Traun’s plan. The Spanish cavalry on the right charged, wounded Aspremont, and scattered the Sardinian horsemen on the Allied left. However, instead of wheeling and striking the exposed Allied left flank infantry, the Spanish mounted troops indulged in a reckless pursuit of the fleeing Sardinian cavalry. The Spanish left flank cavalry also enjoyed an initial success against the Austrian cavalry on the Allied right flank.{{sfn|Browning|1995|p=132}}
Traun rose to the occasion, sending support to his broken left flank and leading his infantry against the Spanish. Taking over from the disabled Aspremont, Karl Sigmund Friedrich Wilhelm Leutrum von Ertingen stabilized the situation on the Allied left. On the Allied right wing, Ludwig von Schulenburg-Oeynhausen organized a successful counterattack by the Austrian horsemen. Despite having two horses killed under him, Traun managed to stay on top of the situation. Meanwhile, Gages stayed in the center of his army, failing to grasp the state of affairs. At length, the entire Allied line drove forward, forcing back the Spanish forces. Gages ordered a retreat at nightfall, aware that the river at his back could lead to a disaster.{{sfn|Browning|1995|pp=132–133}}
Traun rose to the occasion, sending support to his broken left flank and leading his infantry against the Spanish. Taking over from the disabled Aspremont, Karl Sigmund Friedrich Wilhelm Leutrum von Ertingen stabilized the situation on the Allied left. On the Allied right wing, Ludwig von Schulenburg-Oeynhausen organized a successful counterattack by the Austrian horsemen. Despite having two horses under him, Traun managed to stay on top of the situation. Meanwhile, Gages stayed in the center of his army, failing to grasp the state of affairs. At length, the entire Allied line drove forward, forcing back the Spanish forces. Gages ordered a retreat at nightfall, aware that the river at his back could lead to a disaster.{{sfn|Browning|1995|pp=132–133}}
At this time due to the darkness for both of the armies it was necessary to withdraw the field; the Spanish back across the Panaro towards Bologna. Due to the smoke and the darkness, many units lost their way. The 1st Guadalaxara marched in the direction of the advancing austro-sardian infantry columns, and it had to surrender after a short defence inside the walls of a farm.
==Aftermath==
==Aftermath==
De Gages retreated to Bologna but on 26 March he was also forced to retreat to [[Rimini]]. Despite this, the battle was widely considered a victory in [[Madrid]], and de Gages was awarded a [[victory title]]: ”Count of Campo Santo”. Following the battle, [[France]] promised support and co-operation with the Spanish, but for the moment Traun had saved North Italy for [[Maria Theresa]].
De Gages retreated to Bologna but on 26 March he was also forced to retreat to [[Rimini]]. Despite this, the battle was widely considered a victory in [[Madrid]], and de Gages was awarded a [[victory title]]: ”Count of Campo Santo”. Following the battle, [[France]] promised support and co-operation with the Spanish, but for the moment Traun had saved North Italy for [[Maria Theresa]].
==Notes==
==Notes==
;Footnotes
{{reflist|group=note}}
;Citations
{{reflist|30em}}
{{reflist|30em}}
1743 battle during the War of the Austrian Succession
| Battle of Campo Santo | |
|---|---|
| Part of the War of the Austrian Succession | |
 Battle of Campo Santo |
|
| Belligerents | |
|
|
|
| Commanders and leaders | |
|
|
|
| Strength | |
|
9,000 infantry, 3,000 cavalry, 25 guns |
11,400 infantry, 2,600 cavalry, 12 guns |
| Casualties and losses | |
| 397 dead, 1,153 wounded or captured | 1,755 dead, 1,307 wounded, 824 captured |

|
|
The Battle of Campo Santo (8 February 1743) was fought outside Camposanto, Italy, during the War of the Austrian Succession. A Spanish army under Jean Thierry du Mont, comte de Gages faced a combined Austrian–Sardinian force led by Otto Ferdinand, Graf von Abensperg und Traun. Gages invaded the Duchy of Modena and Reggio by crossing the Panaro River but was brought to battle by Traun’s army. The Spanish cavalry won an initial success but failed to capitalize on it. Traun earned acclaim by his brisk handling of the battle and by forcing Gages to recross the Panaro at the end of the day. Although both sides withdrew at nightfall, both sides claimed victory. In fact, the Spanish suffered significantly heavier losses and abandoned Bologna to their opponents several weeks later.
In November 1741, a Spanish expedition evaded Richard Haddock‘s outnumbered British Mediterranean squadron and landed 14,000 Spanish troops at Orbetello on the west coast of Italy. This coup was repeated in January 1742 when the Spanish fleet landed 12,800 more soldiers at La Spezia. This project sprang from the desire of Spain’s Queen Elizabeth Farnese to carve out a new principality in Italy for her son Don Philip. The territory in question belonged to the Habsburg monarchy, but Austria already had its hands full defending Bohemia against the Kingdom of France and the Kingdom of Prussia. It appeared that Habsburg lands were ripe for the taking.
The Kingdom of Sardinia had been wavering, but the Spanish threat drove it to form an alliance with Austria. On 1 February 1742, Sardinia’s foreign minister Carlo Vincenzo Ferrero d’Ormea signed the Convention of Turin with Austria’s representative Ludwig von Schulenburg-Oeynhausen. Accordingly, 18,000 Sardinian troops led by King Charles Emmanuel III took the field together with 12,000 Austrians under Otto von Traun. At the same time, the British squadron was substantially enlarged, making further Spanish reinforcement by sea unlikely.
At first the Spanish intended for the Orbetello force to march north to join the troops at La Spezia before invading the Duchy of Parma and Piacenza. However, the plan was discarded when its authors realized that the army would have to fight its way through the mountains northeast of La Spezia. Instead, 13,500 troops under José Carrillo de Albornoz, 1st Duke of Montemar marched east to Spoleto where they rendezvoused with 12,000 Neapolitan allies under Francesco Eboli, Duke of Castropignano. The La Spezia force marched through the Grand Duchy of Tuscany and joined the other forces at Rimini on the east coast. By this time the Spanish-Neapolitan army counted only 30,000 men, having lost hundreds of soldiers from sickness or desertion.
Blocked by the reinforced British Mediterranean squadron, Spain asked France for permission to march troops across southern France to Italy. France, which previously denied this request, answered in the affirmative and a force under Don Philip advanced as far as Antibes. Unable to use the coast road because the British fleet lurked offshore and blocked by Sardinian troops from using the mountain passes, the Spanish advance stalled at Antibes. By May 1742, the Duke of Montemar’s army had shrunk from desertion and disease to 25,000 men. The Duke of Modena joined the Spanish cause with 5,000 men but this had negative consequences. The Austrian-Sardinian army laid siege to Modena’s citadel on 10 May and secured its surrender on 29 May. Montemar marched his Spanish-Neapolitan army up to the Panaro River on Modena’s border in June 1742 but was blocked from going any farther by the larger Austrian-Sardinian army. Though the authorities in Madrid demanded an assault, Montemar prudently declined to attack and withdrew. Austria and Sardinia successfully defended their territories, but Spain’s army remained a threat.
.jpg)
Madrid ordered the army under Don Philip and Ignace-François de Glymes-Brabant, Lord of la Falize at Antibes to move northward to occupy the Duchy of Savoy. By September 1742, Savoy was easily occupied by Spanish forces. The Habsburg ruler Maria Theresa hoped to use the combined army of Traun and King Charles Emmanuel III to crush Montemar and invade the Kingdom of Naples. Because Savoy was being overrun, Charles Emmanuel instead returned to Piedmont with part of his forces and moved the rest to defend Parma. This ended any chance of an Austrian-Sardinian offensive in Italy.
At the same time, Thomas Mathews, the new commander of the British fleet, sent his subordinate William Martin to the port of Naples with a squadron. On 19 August 1742, Martin arrived off the port and threatened to bombard the city unless King Charles VII of Naples withdrew his troops from Montemar’s army. Bowing to the threat, Charles VII pulled the remaining 10,000 Neapolitan troops from the army of his ally. Martin then sailed to Genoa where he bullied the Republic of Genoa to stop cooperating with the Spanish.
Frustrated at the lack of progress, King Philip V of Spain and his wife Elizabeth Farnese replaced Montemar with Jean Bonaventure du Mont, comte de Gages. Even without the Neapolitan troops, Gages outnumbered his foes, so he advanced with over 13,000 Spanish soldiers to capture Bologna in October 1742. However, when the Spanish army reached the Panaro, it found itself stopped by Traun’s defending army. At the end of September, King Charles Emmanuel launched a campaign to recover Savoy which enjoyed initial success. Unhappy with this setback, Philip V replaced Glymes with Jaime de Guzmán-Dávalos y Spínola, Marquis de La Mina. By January 1743, La Mina cleared Savoy of the last Sardinian soldiers. Savoy represented Spain’s bargaining chip in any future negotiations, but in the meantime, Spanish soldiers terrorized the duchy’s inhabitants.

In the mid-18th century, a battle only occurred when both commanders wanted one or if one side managed to surprise the other. This situation arose because deploying an army took so much time. A commander who wanted to avoid combat could easily withdraw his army before the other side could get their troops arranged to attack. Another reason for 18th century generals to steer clear of battles was their expense in terms of casualties.[11] A famous contemporary of Traun and Gages, Maurice de Saxe once stated, “I do not favor pitched battles … I am convinced that a skillful general could make war all his life without being forced into one.”[12] Gages needed to cross the Panaro in order to advance, but so far, every attempt to do so had been cleverly blocked by Traun’s army.
The stalemate was resolved when Gages received new instructions from Elizabeth Farnese. He was to launch an attack within three days or resign his command. In the other camp, the Sardinian General Ferdinand Charles, comte d’Aspremont-Lynden desired to fight and win a glorious victory, but he had been resisted by the defensive-minded Traun. Fortunately for Gages, Traun was ready to oblige him. Traun was aware of the criticism leveled at him in Vienna, where Maria Theresa’s foreign minister Johann Christoph von Bartenstein and others were losing patience. The Austrian government feared that Charles Emmanuel might reach an accommodation with the Spanish. To prevent that, it would be helpful for the Austrians and Sardinians to fight a battle as allies. Therefore, Traun’s normal reticence to fight was set aside.

Gages arranged a grand ball for the people of Bologna, but it was only a stratagem to trick his enemies. Instead, the Spanish officers quietly left the ball one by one and joined their soldiers who were already assembled. The Spanish army marched north and on 3 February 1743 finally outmaneuvered its enemies, gaining a successful crossing of the Panaro at Camposanto and entering the Duchy of Modena. The initial crossing was made by 12 grenadier companies of the Spanish Guards. Two bridges were built to span the Panaro, one of boats and one of wagons. Patrols were sent downstream and twenty boats filled with provisions and new uniforms were captured.
On 4 February, the army advanced southwest to Solara while leaving 600 men under the Marquis of Barcena to guard the bridges at Camposanto. From there 3,000 cavalry and grenadiers under the Count of Beaufort probed toward the Allied fortifications at Bomporto. After skirmishing with the enemy, Beaufort’s detachment pulled back to Solara. The following day, Gages withdrew the Spanish army to Camposanto, hoping to fool the Allies into thinking that the Spanish objective was Mantua and drawing them out of their position at Bomporto. On 6 February, elements of the Austrian-Sardinian army began appearing near Camposanto. The Allies suddenly vanished from view at 2:00 pm on 7 February. Historian Reed Browning asserted that the Spanish army numbered 13,000 soldiers and the Austrian-Sardinian army counted 11,000 men. Edward Cust credited the Spanish army with 24,000 men and their opponents with 20,000.

On the morning of 8 February 1743, Gages drew up his army facing northwest on the outskirts of Camposanto arranged in the traditional fashion with infantry in the center and cavalry on the wings. The Spanish commander deployed his army in two lines with both right and left flanks resting on the Panaro. The town of Camposanto was behind the Spanish center and the Spanish artillery was divided into three batteries. The Spanish cavalry and dragoons were arranged with nine squadrons on the right and three squadrons on the left. At 10:00 am, Traun’s army appeared again, led by their cavalry and the front of their infantry columns.
Traun drew up his 11,000-strong army with infantry in the center and cavalry on the wings, parallel to the Spanish lines. He placed the Sardinian cavalry on his left flank under Ferdinand Charles, comte d’Aspremont-Lynden. However, being slightly outnumbered, Traun chose to gamble with an un-orthodox strategy. Instead of aligning his soldiers directly opposite the Spanish line, he shifted his troops to the northeast. This placed Traun’s infantry center opposite the gap between Gages’ infantry center and his right wing of cavalry. This meant that Traun would have a greater superiority of numbers on his left wing so he could deliver a flank attack on the Spanish right. The disadvantage was that Traun’s own right flank would be vulnerable to an attack by the Spanish left flank. Traun hoped the troops of his right wing could delay the Spanish left wing long enough for the action on his other wing to be decisive.
Traun hoped to keep the battle short so Gages would not have time to react to his unconventional plan. Gages might have waited until the following day to start the battle. Instead, Gages unwittingly chose 4:00 pm in the afternoon to launch his attack, which left only two hours of February daylight for a battle. This fitted neatly with Traun’s plan. The Spanish cavalry on the right charged, wounded Aspremont, and scattered the Sardinian horsemen on the Allied left. However, instead of wheeling and striking the exposed Allied left flank infantry, the Spanish mounted troops indulged in a reckless pursuit of the fleeing Sardinian cavalry. The Spanish left flank cavalry also enjoyed an initial success against the Austrian cavalry on the Allied right flank.[note 1]
Traun rose to the occasion, sending support to his broken left flank and leading his infantry against the Spanish. Taking over from the disabled Aspremont, Karl Sigmund Friedrich Wilhelm Leutrum von Ertingen stabilized the situation on the Allied left. On the Allied right wing, Ludwig von Schulenburg-Oeynhausen organized a successful counterattack by the Austrian horsemen. Despite having two horses shot under him, Traun managed to stay on top of the situation. Meanwhile, Gages stayed in the center of his army, failing to grasp the state of affairs. At length, the entire Allied line drove forward, forcing back the Spanish forces. Gages ordered a retreat at nightfall, aware that the river at his back could lead to a disaster.
Casualties in the battle were 1,755 dead, 1,307 wounded and 824 prisoners for the Spanish, while the Austro-Piedmontese lost 397 dead and 1,153 wounded or prisoners.
De Gages retreated to Bologna but on 26 March he was also forced to retreat to Rimini. Despite this, the battle was widely considered a victory in Madrid, and de Gages was awarded a victory title: Count of Campo Santo. Following the battle, France promised support and co-operation with the Spanish, but for the moment Traun had saved North Italy for Maria Theresa.
- Footnotes
- ^ Browning and Cust incorrectly stated that Count Aspremont (d. 1772) was fatally wounded (Browning, p. 132; Cust, p. 37). This is incorrect.
- Citations
- Browning, Reed (1995). The War of the Austrian Succession. St. Martin’s Press. ISBN 0-312-12561-5.
- Chandler, David G. (1995). The Art of Warfare in the Age of Marlborough. New York, N.Y.: Sarpedon Publishers. ISBN 1-885119-14-3.
- Cust, Edward (1862). “Annals of the Wars of the Eighteenth Century, Volume 2, 1739-1759”. London: John Murray, Albemarle Street. Retrieved 8 January 2026.
- Ilari, Virgilio; Boeri, Giancarlo; Paoletti, Ciro (1997). La Corona di Lombardia: Guerre ed eserciti nell’Italia del medio Settecento (1733-1763) (in Italian). Ancona: Casa Ed. Nuove Ricerche. pp. 112–114.
- Melendreras Gimeno, María del Carmen (1987). “Las campañas de Italia durante los años 1743–1748” (in Spanish). Editum. ISBN 978-84-7684-078-8. Retrieved 8 January 2026.